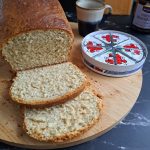
Bread with seeds recipe
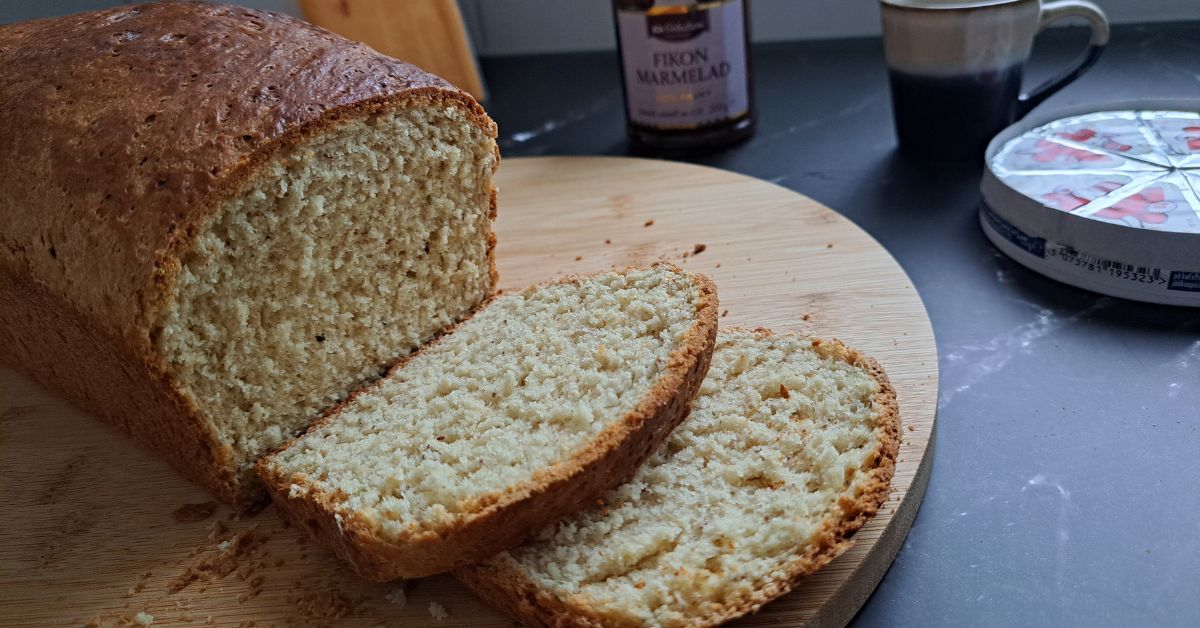
Bread with seeds is a wholesome and nutritious variation that has been enjoyed for centuries. This loaf is enriched with seeds that not only add a delightful crunch and texture but also contribute to the health benefits. Whether it’s the mild nutty flavour of pumpkin seeds or sunflower seeds or the earthy flavour of flax seeds they all come together to elevate the bread to a new level of taste and nutrition. Both pumpkin and sunflower seeds are versatile ingredients, and their flavours can complement a wide range of recipes, from salads to bread, and even as a healthy snack. When used in cooking or baking, these seeds can add a delightful, textural element and contribute their unique taste to the overall dish.
Flours
If you are in Sweden, you can use “vetemjöl special” or “vetemjöl fullkorn” flour to make this bread. Vetemjöl Special is a type of wheat flour often used for bread baking. It is made from high-protein wheat, which helps in creating a strong gluten structure in the dough. This results in bread with a good rise and texture. “Vetemjöl special” can be a versatile choice for various bread recipes. Vetemjöl fullkorn is whole wheat flour. It is made from the entire wheat kernel, including the bran, germ, and endosperm. Using whole wheat flour adds more fibre, nutrients, and a nutty flavour to the bread. It may result in a denser texture compared to bread made with white flour, but it’s a healthier option. I tried mixing both “vetemjöl special” and “vetemjöl fullkorn” in this bread recipe. It results in a well-balanced loaf with a combination of the characteristics of each type of flour. I’ve also tried the recipe with Indian atta (whole wheat flour) and maida (all-purpose flour), and the result is similar.
For a classic option, try our Soft and Fluffy White Bread—light, airy, and perfect for any meal!
Yeast
Proper yeast activation is essential for successful bread baking. It ensures that the yeast is alive and active, contributing to the rise and leavening of the dough. If the yeast fails to activate, the dough may not rise adequately, resulting in a dense and flat loaf.
There are different types of yeasts used in bread baking, each with its own characteristics. The three main types are:
Active Dry Yeast:
This is one of the most commonly used types of yeast in home baking. Active dry yeast is comprised of dormant yeast cells that have been dried and packaged in granule form. Before using, it needs to be dissolved in lukewarm water to activate. This type of yeast has a longer shelf life and is often preferred by home bakers.
Instant Yeast (also known as Rapid rise or Quick rise):
Instant yeast is a more modern form of yeast that comes in smaller granules and doesn’t require pre-dissolving in water. It can be directly mixed with the dry ingredients. Instant yeast activates more quickly than active dry yeast and is often chosen for its convenience. It has a longer shelf life and is considered a reliable and efficient option.
Fresh Yeast (compressed yeast):
Fresh yeast is a moist and perishable form of yeast that is usually sold in small, compressed form. It has a shorter shelf life compared to dry yeast and should be stored in the refrigerator. Fresh yeast has a higher water content and may provide a slightly different flavour profile to the bread. It needs to be crumbled and dissolved in liquid before use.
Yeast activation
The yeast needs a warm liquid (water/milk) to rehydrate and become active. It should be between 100°F to 110°F (37°C to 43°C) is used. Too hot water can kill the yeast, while too cold water may not activate it effectively. Adding a small amount of sugar or another sweetener to the warm water provides a food source for the yeast, encouraging its growth. However, this step is optional, especially if the recipe includes sugars from other ingredients. Allow this to rest undisturbed for a few minutes. This allows the yeast to absorb the liquid and start the activation process. You may observe the mixture becoming frothy or forming bubbles. This foam is a sign that the yeast is producing carbon dioxide through fermentation. Once the yeast is activated, it is ready to be incorporated into the flour and other ingredients to form the dough.

Bread with seeds recipe
Ingredients
1 cup = 250ml
- 2 cups 280gms All-purpose flour/Maida (Vetemjöl special)
- ¾ cup 105gms Wheat flour (Vetemjöl fullkorn)
- ⅓ cup 28gms Oats
- 4 tbsp of mixed seeds (Flax, pumpkin, sunflower)
- 1 tsp salt
- 2 tbsp sugar
- 2 tsp instant-dried yeast
- 200 to 230 ml milk
- 3 tbsp or 43gms of butter salted or unsalted
- 1 room-temperature egg
Instructions
Preparing the dough
- Grind the oats and the mixed seeds in a blender or a food processor and keep them aside.
- In a stand mixer bowl or a mixing bowl, add the all-purpose flour (Vetemjöl special), wheat flour (Vetemjöl fullkorn), ground oats, mixed seeds, egg and salt. Mix everything until well combined.
- Now add the sugar, and instant dried yeast and combine everything well. (Read more about the yeast in the introduction)
- Melt butter in a pan add the milk and combine. Warm it to around 35 to 40 degrees. If you don’t have a thermometer, use your wrist to test the temperature. If it feels very warm on your wrist, it’s ready.
- Add this to the dough and knead the dough in a stand mixer for about 10 minutes. If you are kneading by hand, knead it to a smooth dough and it may roughly take around 20 to 25 minutes.
Windowpane test
- The windowpane test is the best way to test whether the dough is sufficiently kneaded. Take a small ball of the dough and stretch it into a square. Keep on stretching until it becomes a thin film in the middle without breaking. The dough must be thin enough to pass light through it. If it is obtained without tearing, your dough is properly kneaded.
- If your dough breaks easily, keep kneading and repeat the test in a few minutes.
First proofing
- Once the dough passes the windowpane test, remove the dough from the stand mixer bowl and transfer it to a large oiled bowl. Coat the dough with oil on all sides.
- Cover the dough with a plastic wrap or kitchen towel and let it proof in a warm place for about 1 to 2 hours. (Varies depending on the temperature). You can also place it inside the oven with only the lights turned on in cold places.
Shaping the bread
- After the dough is doubled in size, transfer it to a lightly floured countertop or a silicon mat and flatten it gently. Place the smooth side facing down, start rolling it into a log like and seal the edges well.
- Place this on a parchment-lined or well-greased loaf pan with a sealed side facing down.
Second proofing
- Once it is shaped, cover it again with a plastic wrap or kitchen towel and keep it in a warm place for the second proofing. After 1 to 2 hours, the bread rises and now it’s time to bake the bread.
Baking and cooling the bread
- Preheat the oven to 200 degrees Celsius. Brush the top of the bread with milk or egg mixed with 1 tbsp of milk or water. Pop the tray into the oven and bake for about 30 to 35 minutes.
- You may have to cover the top of the bread with aluminium foil halfway through if the top of the bread gets too dark.
- After the bread is done baking remove it from the oven and smear butter on the top. After 5 minutes transfer it to a cooling rack and allow it to cool completely to get clean slices of bread.
Notes
Share Your Creations and Connect with Me on Social Media!
Have you tried this recipe? Don’t forget to tag me with your pictures on Instagram – I love to see your creations! 💕 Also, be sure to comment and rate below! Follow me on social media:
More recipes
4 thoughts on “Bread with seeds recipe”